Mostrando entradas con la etiqueta ¿cómo lo hago?. Mostrar todas las entradas

miércoles, 21 de agosto de 2013

Nat Kalbach's standup bass stencil blog hop

Welcome to Nathalie Kalbach Blog Hop


As many of you already know, my friend Nathalie (n*studio) has designed awesome Stencils for Stencil Girl Products.

How cool is that one of the most creative minds I know, invites you to play with her beautiful stencils?? soo cool indeed :)

I'm so honoured to take part on this week's blog hop, playing with the standup 6*6 bass stencil, together with a group of excepcionally creative women. Thank you so much for inviting me Nat!

Bienvenidos a un nuevo blog hop de Nathalie Kalbach 

Como muchas sabéis, my amiga Nathalie (n*studio) ha diseñado unos fantásticos stencils para Stencil Girl Products

Es genial que una de las personas más creativas que conozco te invite por dos veces a jugar con sus stencils. 

Estoy encantada y muy orgullosa de participar en el blog hop de esta semana, con el stencil de 6*6 del contrabajo, junto a un grupo de artistas excepcionales. Muchas gracias Nat!


I've been always surrounded by music. My brother played the spanish guitar, my sister the violin and I played the piano. When it came to practice the three of us at once ...well, go figure!

That's why this stencil is perfect for me. I've already done some projects with a music theme, and this time, I have a special spot to hang this one. 

Siempre he estado rodeada de música. Mi hermano tocaba la guitarra clásica, mi hermana el violín y yo el piano. Imaginaos el caos cuando teníamos que practicar o ensayar todos a la vez...

Por eso, este stencil es perfecto para mí. Ya he hecho varios proyectos con un tema musical, y esta vez, le he encontrado el sitio ideal en el cuarto de mi hija.


This is how I did this frame.

I used the stencil to hand-carve a stamp

1 & 2. Place the stencil over a carving block and trace it with a pen
3. Carefully, start carving. You can either do the positive or the negative stamp. It's your choice which part you want to carve.
4. Let's check the stamp :) beautiful

Este el es paso a paso.

He usado el stencil para carvar un sello a mano.

1 y 2. Poner y asegurar el stencil sobre el bloque de carvar y contornearlo con un boli
3. Con cuidado, empezar a carvar. Puedes hacer tanto el positivo como el negativo.
4. Comprueba cómo estampa. Me encanta.


Now with the frame.

5. I stained a music sheet with dylusions and distress stains
6. Once dry, apply a thin coat of gesso here and there, with a plastic card. Let it dry.
7. Stamp the bass. I traced the edge with a white pen
8. I wrote the famous quote by Hans Christian Andersen "Where words fail, music speaks", directly in the cardboard of the frame, with a white paint pen.

Y ahora veamos el marco

5. Con tinta dylusions y distress stains, he manchado una hoja de música.
6. Una vez seco, aplica una capa fina de gesso con una tarjeta de plástico y deja que seque.
7. Estampa el sello y repasa los bordes con un rotu blanco.
8. Para acabar, he escrito con rotu blanco la famosa cita de Hans Christian Andersen, "Donde fallan las palabras, habla la música", directamente en el tablero del marco.


I really love how it turned out. I hope you like it too, and try to give another use to your stencils. Imagine the possibilities of a matching stencil and stamp :)

Me encanta cómo ha quedado. Espero que también te guste y pruebes a dar otro uso a tus stencils. Imagina las posibilidades de un stencil y un sello a juego :)


And now, do not miss what these artists made with the stencil.

No os perdáis los trabajos de estas artistas


WAIT!! There's more

I'm pretty sure you might find a GIVEAWAY over at Nat's Blog :) 

BUT...she tells me if you comment here too you will have another entry into her giveaway! 
As a matter of fact she will give you an entry into the giveaway for each blog you comment on--how cool is that! -

Nathalie gives away one of her Standup Bass Stencil.  You have six chances to win it. 
Leave a comment on each of the listed blogs and on my blog  and let us know how you like the projects and Nathalie will pick randomly one lucky winner. 

You have time to comment till August 27, 2013 - midnight EST.

AÚN HAY MÁS

Pásate por el Blog de Nat, donde podrás ganar uno de sus stencils del Contrabajo 

Peeero... me ha dicho que si dejas aquí en mi blog un comentario, tendrás otra oportunidad para conseguirlo.

De hecho, si dejas un comentario en cada uno de los blogs participantes y en el mío, tendrás en total 6 oportunidades de ganar tu stencil. Dinos cuánto te gustan los stencils y suerte!

Nathalie escogerá al azar al ganador.

Tienes hasta el 27 de agosto de 2013 a medianoche EST para dejar tu comentario

viernes, 9 de agosto de 2013

Mas Papel #10 - colores de verano


Ya está en la "calle" el número de verano de Más Papel., revista creada y editada por Kris.
Trabajos frescos y creativos. No te lo pierdas

Esta es mi aportación de este número.
Una tablilla de madera en la que he hecho una transferencia con papel encerado. (Entra en la revista para ver el paso a paso)
Y una página digital con el kit facilitado.
Espero que os guste. Gracias por la visita
Y gracias Kris, por contar de nuevo conmigo.

The summer issue of Mas Papel, a magazine created and edited by Kris, is out
Fresh and creative artwork. Do not miss it.

This is my contribution. 
A wooden board. I transferred the image using the wax paper technique. See the step-by-step in the magazine.
A digital layout created with the digital kit given.
I hope you like it. Thanks for your visit


miércoles, 7 de agosto de 2013

Nathalie Kalbach and Stencil Girls Products Blog Hop


Welcome to Nathalie Kalbach and Stencil Girl Products Blog Hop

As many of you already know, my friend Nathalie (n*studio) has designed several Stencils for Stencil Girl Products and she is organizing a blog hop for everyone to know them.

You can imagine how happy I am for her and how honoured I feel for being part in this week's blog hop, together with a group of excepcionally creative women. Thank you so much for inviting me Nat!

We all used the Crackle stencil for our projects. One of my favourites.

It is perfect for backgrounds and so versatile for any artistic proyect. the design of the holes in random sizes and layout makes it look like real crackles

Bienvenidos al Blog Hop de Nathalie Kalbach and Stencil Girl products

Como muchas sabéis, mi amiga Nathalie ha diseñado una colección de stencils para Stencil Girl Products y para darlos a conocer ha organizado diversos blog hops

Os podéis imaginar lo feliz que estoy por ella y lo entusiasmada que estoy de participar en el blog hop de esta semana, junto con un grupo de mujeres excepcionalmente creativas. Muchas gracias por la invitación Nat!

El stencil que hemos utilizado para nuestros proyectos es uno de mis favoritos. Un craquelado.
Es perfecto para fondos y muy versátil para utilizar en cualquier proyecto artístico. El diseño de los huecos de distintos tamaños y la disposición caótica de los mismos hace que el resultado sea muy similar a un craquelado real.


For my project I altered a terracotta pot (1)
Hold the stencil around the pot and secure it with masking tape (2)
Apply a generous coat of texture paste (3)
Lift the stencil and let it dry (clean the stencil asap) (4)
Once dry, sand the surface a bit, to make it even and one by one paint the crackles with the new Kuretake's Wink of Stella brush in golden colour. (5)
If you apply more than a layer of paint in several crackles randomly, you'll get a great effect of lights and shadows (6 and 7)

That's it. A pot with personality. I hope you like it.

Yo he alterado una maceta de terracota (1) 
Una vez sujeto el stencil con cinta de carrocero (2), aplico una capa gruesa de pasta de textura (3) 
Levantar el stencil y dejar secar (4) - limpia el stencil en cuanto puedas
Una vez seco, paso una lija para igualar el grosor y uno a uno, coloreo los trocitos de craquelado con el pincel dorado Wink of Stella Brush de Kuretake. (5)
Aplicando aleatoriamente distintas capas con el pincel, el efecto del brillo del craquelado destaca luces y sombras (6 y 7)

Listo, una maceta con personalidad :)

Espero que os guste. 


And now, do not miss what these artists made with the stencil.

No os perdáis los trabajos de las demás.


WAIT!! There's more

I'm pretty sure you might find a GIVEAWAY over at Nat's Blog :) 

BUT...she tells me if you comment here too you will have another entry into her giveaway! 
As a matter of fact she will give you an entry into the giveaway for each blog you comment on--how cool is that! -

Nathalie gives away one of her Crackle Stencils. You have six chances to win it. 
Leave a comment on each of the listed blogs and on my blog  and let us know how you like the projects and Nathalie will pick randomly one lucky winner. 

You have time to comment till August 13, 2013 - midnight EST.

AÚN HAY MÁS

Pásate por el Blog de Nat, donde podrás ganar uno de sus stencils de craquelado.

Peeero... me ha dicho que si dejas aquí en mi blog un comentario, tendrás otra oportunidad para conseguirlo.

De hecho, si dejas un comentario en cada uno de los blogs participantes y en el mío, tendrás en total 6 oportunidades de ganar tu stencil. Dinos cuánto te gustan los stencils y suerte!

Nathalie escogerá al azar al ganador.

Tienes hasta el 13 de agosto de 2013 a medianoche EST para dejar tu comentario

lunes, 13 de mayo de 2013

Fly me to the moon...

A la luna... o adonde sea...

Un nuevo proyecto, esta vez un canvas board para Kuretake.

Pásate por el blog para ver el paso a paso.

Gracias por la visita

A new project -a canvas board- for Kuretake.

Have a look at the blog to see the step by step pics.

Thanks for your visit


viernes, 22 de marzo de 2013

Decorando Teselas / Glass tiles

Un nuevo paso a paso para StampersBest.

Usalas como colgantes, anillos, broches, imanes... ¿tú que uso le darías?

A new step by step for StampersBest.

Use these tiles as pendants, rings, magnets... How would you use them?

crochet background rubber stamp


lunes, 18 de marzo de 2013

Fill me with stories...

Portada de mi último artjournal.

... porque tengo muchas historias que contar

Cover for my last art journal.

... because I have so many stories to tell


ZIG art & graphic twin, metallic writer and embossing pens by Kuretake.

jueves, 17 de enero de 2013

Fly - Art Journal for Stampersbest

Me encanta el aire vintage de los últimos sellos de StampersBest.
Y el globo y la brújula se han convertido en unos de mis preferidos.
Os dejo un tuto para una página de art journal con algún truco para colorear los sellos.
Espero que os guste.
Gracias por la visita

I love the vintage feeling of StampersBest last releases.
The airship and the compass have become one of  my favourites.
Here you have a new tutorial using these stamps in my art journal and some tips to colours the stamps.
I hope you like it.
Thanks for stopping by

Brick wall
Leaves background
Airship
Compass


viernes, 23 de noviembre de 2012

Decorando con fotos / Decorate with photos


Gracias a HP he tenido la oportunidad de participar en su campaña para dar a conocer la calidad de sus tintas compatibles.HP propuso a un grupo de bloggers un reto: idear propuestas creativas para decorar tu casa usando fotografías y, a la vez, conservar tus recuerdos de una forma original.

I've been invited to take part in a promotional campaing for HP Spain. They challenged a group of bloggers to propose new creative ideas of home decor, using photographs
Para ello, HP ha tenido la gentileza de prestarme una impresora HP PHOTOSMART 7520, los consumibles y el papel fotográfico.
La impresora es “All in one”. Cuenta con funciones de impresión, copia y escaneo. Puede imprimir a doble cara de serie y además cuenta con conectividad inalámbrica para poder imprimir a través de Internet. Tiene una pantalla táctil de 4,3”, por lo que la mayoría de las funciones son accesibles sin necesidad de utilizar el ordenador. Incluso puedes imprimir directamente desde internet utilizando Google Cloud Print

La mayor ventaja que le veo a la impresora es la calidad del color y que las tintas originales son resistentes al agua, y los papeles llevan una capa especial anti ondulación, por lo que las fotos pueden estar situadas en lugares como la cocina y el baño sin peligro alguno.¿Sabías que una fotografía 10x15 cm impresa con consumibles HP tiene 35 millones de gotas de tinta y que cada segundo, caen 36.000 gotas de tinta? Curioso, ¿no?

HP sent me their "all in one" printer HP PHOTOSMART 7520, ink supplies and photo paper to make the projects. You can see all tech data of the printer in HP official site.The best advantage of the printer is the good colour quality and that the inks are water resistant, and the photos  do not bend thanks to a special coat on the papers. So your pics can be hanged on the kitchen or even the bathroom.

Como scrapbookers, la importancia que le damos a las fotografías es vital. Y que la calidad del papel sea buena es fundamental para que nuestros trabajos aguanten carros y carretas con el paso del tiempo.
Por eso, en mis propuestas, no podía faltar una página de scrapbooking, un objeto alterado y un proyecto en el que no tuviera que utilizar costosos materiales.

As scrapbookers, the relevance of our pictures are vital. And also the quality of our photos, so they can last through time.My proposals are an altered frame, a hanging collage and of course, a scrapbooking layout.

Para el primer trabajo, compré unos marcos barrocos baratos y muy, muy dorados en distintos tamaños. Les quité el cristal y la trasera y los tuneé con una capa de cera, pintura y lija. Mucho mejor y menos “cantoso”.Las fotos están retocadas con un filtro sepia, que les da un aire “antiguo”.Para “colgar” las fotos en el marco grande, utilicé una cinta de organza ancha. Las fotos llevan un imán, de modo que puedo cambiarlas según me apetezca.La foto del marco mediano, está pegada directamente en la pared, con cuadros de foam, para darle profundidad, y como no deja huella, puedo cambiarla cuando quiera, al igual que la foto pequeña.

I bought three cheap and barroque golden (golden, golden) frames in different sizes. I removed the glass and the back and I altered them with wax, paint and sand. Much better :)I also applied a sepia filter to the pictures 


El segundo proyecto lo hice pensando en la decoración de Navidad.
Unas cintas anchas de organza y unas pinzas navideñas para sujetar las fotos, le dan un aire festivo al muro que hay en la entrada de mi casa. Un bonito rincón donde poner el árbol este año.Mi madre ya ha dicho que en cuanto pasen las fiestas, se lo lleva a su casa.

Thinking of Christmas, I used wide organza ribbon to display the photos and christmas pegs to attach them.


Y por último una página de scrapbooking, donde lo primordial es la foto.

And this is the scrapbooking layout


Y esto es todo. Espero que os haya gustado y os de alguna idea de cómo utilizar vuestras fotos “de otro modo”.
Gracias por la visita y gracias HP por contar conmigo.

And that's it. I hope you liked my projects and be inspired to use your photos in a diferent way.Thanks for stopping by and thanks HP.

lunes, 12 de noviembre de 2012

Christmas candles / Velas para Navidad

Mi nuevo tutorial para StampersBest. Ve preparando la mesa para Navidad

My new tutorial for StampersBest. Christmas is coming...


miércoles, 7 de noviembre de 2012

Crayons background / Fondos con ceras del cole

Si hay algo que me gusta, es probar cosas nuevas con lo que tengo más a mano.
El último experimento ha sido con ceras de colores y la plancha.
Muy divertido y totalmente recomendable para hacer con los niños (con supervisión, que se usa la plancha)

Si quieres ver el paso a paso, echa un vistazo a la página de mixed media art net
Esta semana he colaborado con este artículo.

You all know how I love to play with everyday objects that I have within reach.
The last experiment has been a background with crayons and the iron
So much fun. I totally recommend it to do it with the kids (under supervision of course, because of the iron)

If you want to see the step by step, have a look at my article at mixed media art net.

Thank you Michelle for inviting me again.


martes, 9 de octubre de 2012

Treat bag

why do not treat the kids -or the adults- at the Christmas table? Put some sweets inside this little paper bag and decorate according to the season.
I see Halloween here... :)

Por qué no poner unas bolsitas con chuches para los niños -y los no tan niños- en la mesa de Navidad?
Cambia la decoración y úsalas de acuerdo a lo que celebres. ¿Qué tal halloween?

StampersBest "Tis the season tickets"


viernes, 10 de agosto de 2012

Timeless Tag for StampersBest

Para aquellas que no lo hayáis visto en facebook, os dejo el nuevo tutorial que he preparado para StampersBest.
Espero que os guste.
Feliz finde!!

A new tutorial I made for StampersBest.
Hope you like it.
Have a nice weekend!


Supplies:
StampersBest Create a Cameo Stamp Collection
StampersBest Doodle Borders Stamp Collection
gold UTEE
skeleton leaf
white shrink plastic
black ink
Versamark
tag
background paper, dictionary
distress inks
lace piece for border
adhesive tabs for cameo embellishment
ribbon for tag

lunes, 20 de febrero de 2012

AJED 2012 #12 - You make the rockin' world go round

Desde jovencita siempre he estado batallando con la balanza... y esa batalla me ha acompañado siempre.
No fue un especial problema hasta que llegó un momento en que me costaba encontrar ropa de mi talla que me gustara, pero no tenía la fuerza de voluntad suficiente para ponerle solución. Esto fue hace más de 15 años.
Mi santo al verme de bajón me dijo entonces que tomara una determinación, pero que lo hiciera por mí, por mi salud y por mi autoestima, no por lo que hablaran los demás de los kilos que me sobraran. Me quería así, y lo sigue haciendo.
Y funcionó, perdí más de 20 kilos y "engordé de orgullo" por haberlo conseguido. Cogí unos cuantos y los volví a perder. Aún me sobran unos kilos, pero estoy encantada con ellos.
Os cuento esto porque hoy, escuchando a Queen, me he vuelto a reir con el título de una de mis canciones favoritas: "fat bottomed girls".
La letra no es exactamente como quisiera jajaja, pero el estribillo y el título me encanta: You make the rocking' world go round.
¿será verdad que las que estamos "entradas en kilos" movemos el mundo?
Os dejo con el "making of" de la página que me ha inspirado la canción, en versión Glee.
Espero que os guste y si estás pensando en tomar una determinación, adelante, pero que sea por tí, porque te lo mereces :)


I've been always struggling with my weight.
It wasn't a problem at all until I found that it was so difficult to find clothes for my size (it was more than 15 year ago), but I didn't have the courage to start a diet and solve the problem.
My hubby, seeing me so flat, told me that I should take a decision, but I had to do it for me, for my health, for my self-steem, not for what the others  talked about my kilos. He loved me as I was, and still does.
And it worked, I lost more than 20 kilos and "gain pride" for the achivement.
I gained again some kilos and then lost them again along the years, but I'm ok with it. I'm healthy and wear the clothes I like.
I tell you this, because I've been listening to Queen today and I again smiled with one of my favourites songs: fat bottomed girls
The lyrics are not exactly what I wanted to mean, LOL, but I love the chorus "You make the rocking' world go round"
Will it be true? we - fat botommed girls, make the world go round :)
I leave you with the making of the art journal page that the song inspired me. (Glee cast version)
I hope you like it and -here's my two cents- what you do it, do it for yourself, not for what the others could think ... You're worth it


domingo, 5 de febrero de 2012

My Creative Jump Start 2012

Se acabó enero, y si me descuido se acaba febrero.

Uno de los hitos de este mes, ha sido el Creative Jump Start que ha organizado Nathalie Kalbach y al que muchas de vosotras os habéis suscrito.

Un mes lleno de inspiración e ideas para empujarnos a "currar".

En la última newsletter tenéis las indicaciones para ver todos los Jump Starts, si os habéis perdido alguno. En el blog de Nat bajo la pestaña de Free Tutorials.

Aquí tenéis el mío.

January is ended and also the Creative Jump Start Summit 2012 hosted by Nathalie Kalbach.


A month full of inspiration and ideas to jump start our creativity.


Many of you are subscribed and will know how to see all the Jump Starts in case you missed it. In Nat's blog under the tab "free tutorials"


Here you have my contribution.

Password: pontelaspilas


Ver en Vimeo http://vimeo.com/32113426

Mil gracias a todas las jumpstarters por compartir sus ideas y su tiempo y sobre todo gracias a Nat por confiar en mí y contar conmigo en este fantástico proyecto.

Espero que os haya gustado y hayáis aprovechado alguna de las ideas y trucos de las jumpstarters. Si ha sido así, recordad que hay abierta una galería en flickr para compartir todos vuestros trabajos.

Me encantaría escuchar vuestra opinión sobre mi Jump Start y, en general sobre todo el proyecto. ¿Quién sabe si habrá una edición 2013?

Muchas gracias por la visita.

Thank you so much to all the jumpstarters for sharing their ideas and their time and above all, thank you Nat for trusting me for this awesome project.


I hope you liked it and if you made something inspired by some of the ideas or tips of the jumpstarters, remember there's a flickr gallery to share all the artwork.


I would love to hear from you about my Jump Start and about the whole project. Who knows? maybe we can ask for a 2013 edition? Nat?


Thank you!

martes, 31 de enero de 2012

AJED 2012 #8 - Love

Mi colaboración con mixedmediaart.net esta vez trata sobre cómo inspirarnos con las cosas que nos rodean.

Si quieres ver cómo he hecho esta página de mi artjournal, pásate por su web

My article this time over at mixedmediaart.net is about getting inspired by what we have around us.

I made this art journal page. If you want to see how I did it, have a look at their website.


viernes, 2 de diciembre de 2011

ATC / Gift tag for a belated gift

¿Quien no ha hecho algún regalito fuera de fecha? ¡¡Que levante la mano!!

Pues aquí tenéis un tag/ATC para acompañarlo.

Para esta ATC, he hecho el fondo directamente en el sello "brick wall" de Stampers Best y, como si fuera un graffiti en el muro, he estampado a la abuela motera.

¿Quieres ver cómo lo he hecho? Aquí tienes el video.

Have you ever been late giving a present? I have!


Here you have a tag/ATC perfect to match that belated gift.


To make this ATC I made the background from scratch using PVA glue over StampersBest "brick wall" rubber stamp, and as a graffiti on the wall, I stamped the "biker granny" -Born to be wild rubber stamp-


Want to see how I made it? Here you have the video tutorial.


Espero que os guste. Gracias por la visita

I hope you like it. Thanks for stopping by.


miércoles, 26 de octubre de 2011

Tres en Raya para Halloween / Halloween Tic-Tac-Toe

Desde hace unos años, en casa hacemos una pequeña fiesta la noche del 31 de octubre.

Una excusa como cualquier otra para pasar un rato divertido, con disfraces, actividades y juegos para los niños y merendola para todos.

From a few years now, we celebrate a little halloween party at home on the 31st of october, with kids activities, costumes and games for everyone.

Este año, he preparado un juego de las tres en raya con una cajita de los chinos, restos de un juego de damas y los rotus Art & Graphic Twin (con el pincel de acuarela), Zig Millennium, Zig posterman y Wink of Stella de Kuretake. Para pegar todo he utilizado el Zig 2 way glue, también de Kuretake.

This year, I created a tic-tac-toe game with a little box from the dollar store, some missmatched game pieces and the kuretake pens Art & Graphic, the watercolour brush, Zig millennium, Zig posterman, Wink of Stella and Zig 2 way glue.


Así es como lo he hecho.

This is how I made it

Con las fichas de las damas, he dibujado el contorno de los dibujos con los Zig Millennium y he diseñado unas calaveras para un equipo y unos sombreros de bruja para el otro.

I traced the outline of the game pieces with Zig Millennium and drew some cute skulls and witches hats.


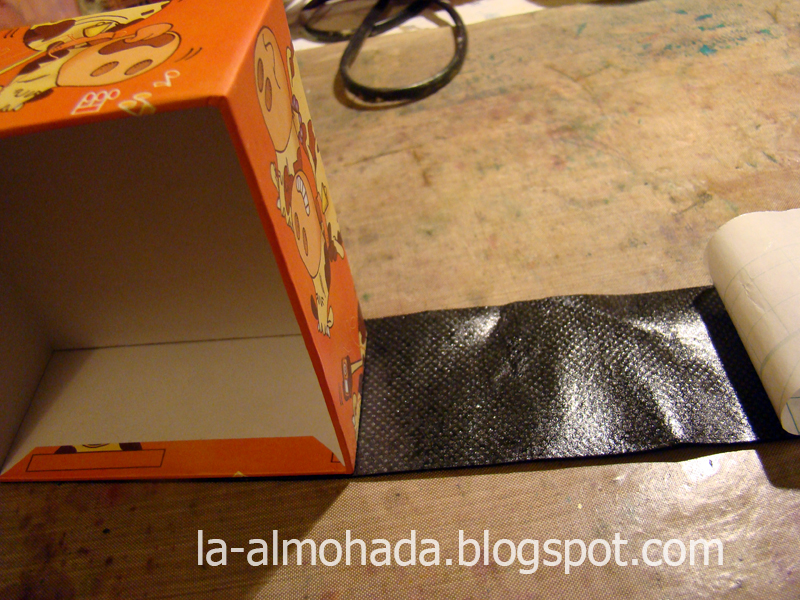
He forrado la parte de abajo de la caja con terciopelo negro adhesivo

I covered the bottom part of the box with black adhesive velvet


Cogiendo la tinta de los rotuladores directamente con el pincel de acuarela, he pintado los dibujos.

Taking the ink with the watercolour brush directly from the pen tip, I coloured the images


Los brillos y los detalles, con el wink of stella naranja.

I added some sparkle with Wink of Stella pen


Los he recortado y pegado sobre las fichas de damas

I cut them out and glued on the game pieces


He lijado los bordes y he dado un poco de tinta por los bordes

I sanded and inked the edges


Para el tablero, he pintado unos palillos con el rotulador Posterman y lo he pegado sobre la tapa de la caja

For my game board, I painted four sticks with Posterman marker and glued them over the lid box


Un par de capas de polvo de embossing para proteger y dar brillo al papel

A couple of layers of clear embossing powder to add some shine and to protect the paper


Y listo para jugar. Y al terminar, queda todo guardado en la misma caja.

A David le ha encantado. Y a tí, ¿te gusta?


And ready to play with. When finished, just put everything inside the box.


David loved it. And you? Are you ready for halloween?